Recompilare OpenSSL 1.1 & NGINX 1.25 per TLS 1.3 (CentOS 7), urmând scenariul în care ai deja instalat pe server o versiune mai veche openssl asociată serviciului nginx.
contenuto
Mai exact, să poți activa OpenSSL 1.1.1t pentru serviciul NGINX, care rulează cu o versiune mai veche. OpenSSL 1.0.2k.
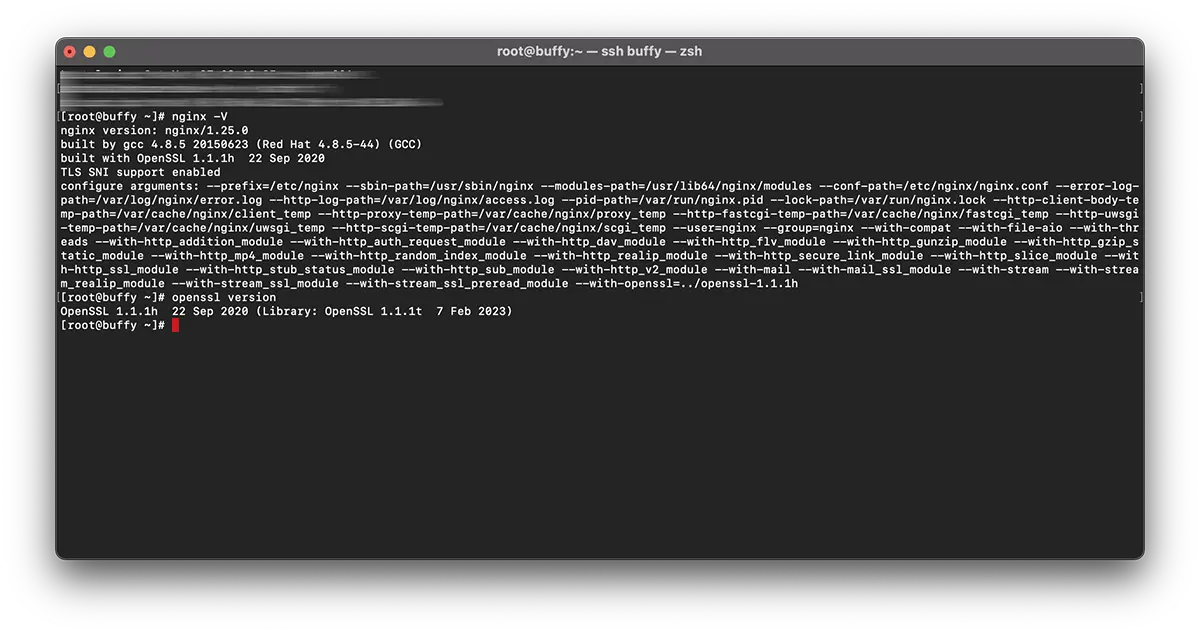
# nginx -V
nginx version: nginx/1.25.0
built by gcc 4.8.5 20150623 (Red Hat 4.8.5-44) (GCC)
built with OpenSSL 1.0.2k-fips  26 Jan 2017
TLS SNI support enabled
# openssl version -a
OpenSSL 1.1.1t 7 Feb 2023Asta înseamnă că pe server se află doua versiuni diferite ale OpenSSL. O versiune instalată pe sistem prin “yum” (1.0.2k-fips) și o versiune OpenSSL instalată prin compilare manuală (openssl 1.1.1t).
În mod clasic, majoritatea recomandă reinstalarea ‘OpenSSL‘ la nivel de serever. Asta ar presupune executarea comenzii: yum remove openssl. Numai că aici există o mare problemă. Odată cu dezinstalarea vechii versiuni OpenSSL, este posibil să fie nevoie și de dezinstalarea unor aplicații dependente. Cum ar fi: nginx, MariaDB-server, cerbot, plus multe altele.
O soluție mai simplă este să recompilați openssl 1.1 & nginx 1.25 per TLS 1.3.
Tutorial recompilare OpenSSL 1.1 & NGINX 1.25 per TLS 1.3 (CentOS 7)
În exemplul meu, recompilarea este pentru nginx/1.25.0 & OpenSSL 1.1.1h folosind librăriile OpenSSL 1.1.1t.
Recompilare NGINX.
1. Creezi fișierul: nginx-with-tls13-compile.sh
sudo nano nginx-with-tls13-compile.shîn care adaugi scriptul:
#!/bin/bash

## nginx
NGINX=nginx-1.25.0.tar.gz

if [ ! -f "${NGINX}" ];then
    wget https://nginx.org/download/${NGINX}
fi

ND=$(basename $NGINX .tar.gz)
if [ ! -d "${ND}" ];then
    tar zxvf ${NGINX}
fi

cd ${ND}

## pre require package
## yum install gcc pcre-devel zlib-devel

./configure --prefix=/etc/nginx \
    --sbin-path=/usr/sbin/nginx \
    --modules-path=/usr/lib64/nginx/modules  \
    --conf-path=/etc/nginx/nginx.conf \
    --error-log-path=/var/log/nginx/error.log \
    --http-log-path=/var/log/nginx/access.log \
    --pid-path=/var/run/nginx.pid \
    --lock-path=/var/run/nginx.lock \
    --http-client-body-temp-path=/var/cache/nginx/client_temp \
    --http-proxy-temp-path=/var/cache/nginx/proxy_temp \
    --http-fastcgi-temp-path=/var/cache/nginx/fastcgi_temp \
    --http-uwsgi-temp-path=/var/cache/nginx/uwsgi_temp \
    --http-scgi-temp-path=/var/cache/nginx/scgi_temp \
    --user=nginx \
    --group=nginx \
    --with-compat \
    --with-file-aio \
    --with-threads \
    --with-http_addition_module \
    --with-http_auth_request_module \
    --with-http_dav_module \
    --with-http_flv_module \
    --with-http_gunzip_module \
    --with-http_gzip_static_module \
    --with-http_mp4_module \
    --with-http_random_index_module \
    --with-http_realip_module \
    --with-http_secure_link_module \
    --with-http_slice_module \
    --with-http_ssl_module \
    --with-http_stub_status_module \
    --with-http_sub_module \
    --with-http_v2_module \
    --with-mail \
    --with-mail_ssl_module \
    --with-stream \
    --with-stream_realip_module \
    --with-stream_ssl_module \
    --with-stream_ssl_preread_module \
    --with-openssl=../$(basename $OPENSSL .tar.gz)

make

sudo make install

nginx -V
Salvezi noul fișier.
2. Faci noul fișier executabil:
chmod +x nginx-with-tls13-compile.shRescriere nginx.service
3. Faci un backup al nginx.service.
cat /lib/systemd/system/nginx.service > /srv/nginx_service.txt(poți alege orice path dorești pentru nginx_service.txt)
4. Creezi fișierul pentru serviciul nginx: nginx.service
sudo nano nginx.service5. In fișierul noul fișier nginx.service adaugi liniile:
##  /lib/systemd/system/nginx.service

[Unit]
Description=The NGINX HTTP and reverse proxy server
After=syslog.target network.target remote-fs.target nss-lookup.target

[Service]
Type=forking
PIDFile=/run/nginx.pid
ExecStartPre=/usr/sbin/nginx -t
ExecStart=/usr/sbin/nginx
ExecReload=/usr/sbin/nginx -s reload
ExecStop=/bin/kill -s QUIT $MAINPID
PrivateTmp=true

[Install]
WantedBy=multi-user.target
6. Copiezi fișierul în ‘daemon“.
sudo cp nginx.service /lib/systemd/system/nginx.service7. După ce fișierul a fost copiat, actualizați permisiunile fișierului folosind comanda:
sudo chmod 644 /lib/systemd/system/nginx.service8. Reload configurarea systemd pentru a lua în considerare modificările folosind comanda:
sudo systemctl daemon-reload9. Restartați ngnix.
sudo systemctl restart nginxRecompilare OpenSSL / NGINX per TLS 1.3
10. În acelși folder în care ai fișierele nginx-with-tls13-compile.sh E nginx.service, creezi un nou fișier: openssl-1.1-compile.sh.
sudo nano openssl-1.1-compile.shAdaugi scriptul:
#!/bin/bash

## Compile OpenSSL
OPENSSL=openssl-1.1.1h.tar.gz

DONE=openssl-compile-done

if [ ! -f "${DONE}" ] ;then
    wget https://www.openssl.org/source/${OPENSSL}

    tar zxvf ${OPENSSL}

    cd $(basename $OPENSSL .tar.gz)

    ./config shared no-idea no-md2 no-mdc2 no-rc5 no-rc4 --prefix=/usr/local/

    make

    sudo make install

    cd ..

    touch ${DONE}
fi

export LD_LIBRARY_PATH=$LD_LIBRARY_PATH:/usr/local/lib64/

read -n1 -r -p "$(/usr/local/bin/openssl version) - Press any key to continue..." key

source ./nginx-with-tls13-compile.sh
Înlocuiti “OPENSSL=openssl-1.1.1h.tar.gz” cu versiunea pe care doriți să o instalați și recompilați cu NGINX.
11. Faceți scriptul executabil:
chmod +x openssl-1.1-compile.sh12. Executați comanda:
./openssl-1.1-compile.shAșteptați până ce se finalizează procesul de recompilare OpenSSL & NGINX.
Dacă vă putem ajuta sau sunt de făcut completări, rubrica de comentarii este deschisă.